DIY Solder Equipment
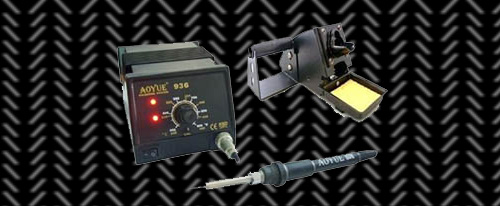
My Aoyue 936 solder station. 40 watts and temps up to 896F
When you decide to jump into the DIY world as it relates to guitar gear chances are whatever it is will involve soldering of components. Be it building/modding fx pedals or amp building/modding or hot rodding guitars you’re going to have to solder. It’s not hard to learn to solder if you have the right tools. I’ve known how to solder for many years but I wasn’t an expert by any stretch. So like most I went out and got a fairly cheap soldering iron and some solder and jumped in with both feet. I’m sure most newbies do the same. And a cheap setup will get you by, but if you get into it like I did you’ll want a more proper setup. Here’s what I found: I started off with a Weller W25 which is a decent unit but I found it not very suitable for getting into tight small areas crowded with connecting wires and other components. It was a little too big to fit without contacting and burning everything around the target area. And I think it was much hotter than I need because I ruined a few components with the heat. This is when I decided to get something better and more appropriate.

They also have a smaller unit, the 469. At 70 watts it’s great little unit.
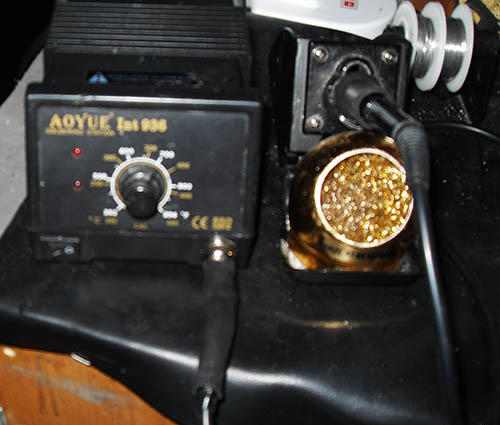
Enter the Aoyue Int 936 solder station. It looked like it would be perfect so I grabbed one (on sale $39). I’ve been using it for well over a year now and I can honestly say it’s the perfect rig for my purposes. It’s a Chinese clone of a Hakko unit and it just works. I’ve only had two issues. The calibration trimpot accessible from the front got wrenched from the PCB when I turned a little too hard while calibrating. No problem though, I just replaced it. And replacing the heating element in the iron was not fun especially after I broke the new one (they’re ceramic and kinda fragile). But another new element and a lesson learned and I was back to work. They also make the smaller model 469 which I bought after I broke my 936 but then I started missing my original unit so I fixed it and all is right with the world once more. Sorry I didn’t mean to go off topic on you. The point is in my opinion it’s better to spend a little more and get something that was designed for the task at hand. There are solder stations that will work priced from $20 to $100 with several right at $50. What you want to look for is a unit with a grounded tip (ESD safe) and
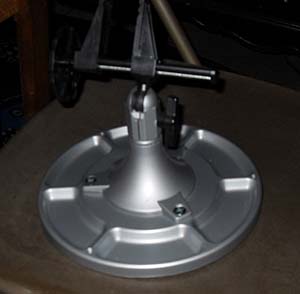
the PanaVise is worth it’s weight in gold IMHO
adjustable temps up to 800F. I run mine at 700F and it works for the majority of what I do. I keep a single temp iron with a fat tip for bigger jobs like soldering pickup covers to the base plate. If you’ve got the extra bucks to blow on equipment ($139), Lab 1 makes a bad-ass solder station that has an adjustable up to 12v power supply and a digital volt meter all in one desktop unit and the soldering iron specs are spot on what you need (DISCLAIMER; I have not used one personally so I am making no claims as to quality, but I’ve not seen a bad review of this unit) So there you have it. A solder station will make your DIY projects go much smoother.
Just a quick note on a few other tools you may want: I keep on hand a dental pick, several screw drivers, forceps, pliers, and a good pair of wire cutters that cut close to the surface as well as a solder pump and solder braid. All get used frequently. But something new to my arsenal is an awesome addition. I got a PanaVise. Don’t know how I ever lived without it. It’s designed to hold small circuit boards and can be rotated to any working angle. I can’t remember how many times I got frustrated because a board slid on me and screwed up a solder joint. Not a problem now. I got the smallest unit called the PanaVise Jr. Then I added the weighted parts tray base and it’s freakin’ sweet. As far as the price, it was a bit more than those “helping hands” units (you know, the ones with the magnifying glass and alligator clips) but it was worth every penny and then some. PanaVise with base was $52 compared to those helping hands which run $20 to $30. They’re better than nothing at all, but the PanaVise is top dog in this department. As for solder, I use 62/36/2 silver bearing solder in .022 thickness and it works extremely well for me. But there are others that will work as well. You just got to try em’ and see what works for you. I hope this helps and in a future article I’ll be covering some little tricks I’ve picked up along the way to make life in the DIY world a bit easier. As always, in regards to all of the above, YMMV.
Related articles
- Diy Guitar Pedals (diy-home-tips.com)
- Re: DIP plug pin repair suggestions? (eevblog.com)
- Tool kits to help you practice what you learn (londonjewelleryschool.co.uk)
- How to Hack Your Next Circuit Board Project (labs.ideo.com)
Give Your DIY Stompboxes a Stunning Finish
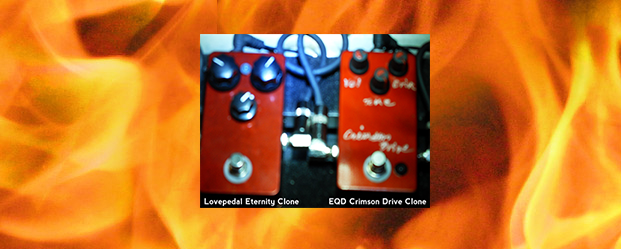
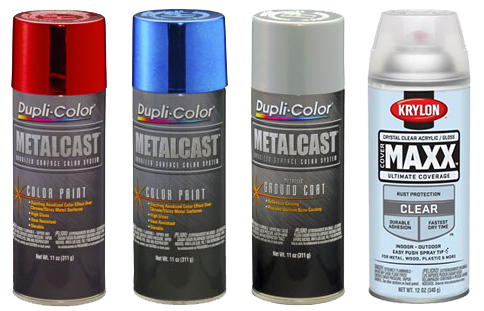
Since I got into the whole DIY stompbox thing I find myself looking for those things that will make a build unique. I’m sure you all do it too. So the other day I was driving past an Autozone and decided to pop in and take a look at the available paint colors. Brother did I hit the DIY jackpot! “Dupli-Color / Metalcast Anodized Coating“. It comes in blue, and red and possibly green and it’s freakin’ awesome! I went with red since my Crimson Drive clone
Between my crappy worn out camera and bad lighting these pics do not do these pedals justice, Not even close.
Check the red and blue caps. They’re accurate.
was one of the ones needing paint (I’m going back for some of the blue too). It’s made to paint on chrome and makes it look like it’s been anodized. They have an undercoat specifically for this stuff if you’re not putting it on chrome but trying to save a few bucks (and having that DIY mentality) I figured I could find a way to make it work. What I found was that a solid silver paint works great and gives it the appearance of candy paint. I also took a new enclosure and polished the shit out of it to get it as shiny as possible. It looks really cool as well but a bit darker which I like. I believe this stuff bears some experimentation with different base coats. There’s no telling what we may conjure up. Overall it was a spectacular find (for me at least).
Details
Name: Dupli-Color / Metalcast Anodized Coating
Uses: Made for use on chrome
Primer: None. It’s made to use directly on chrome but they have a special undercoat for use on non-chrome. Any good “silver” color works.
Ease of use: On a 10 scale it gets the full 10. it sprays on really smooth and even. And it dries mega-fast! Like 20 minutes and it can be handled (a DIY dream!).
Coverage: 2 light coats then a third wet coat It’s very translucent by design so you won’t be covering anything up with this even if you tried.
Clear coat: The directions never specify the need for a clearcoat but I used Krylon MAXX Hi-Gloss Clear to be safe. Like I said, it looks like candy paint when done.
Final thoughts: At $8.99 it’s a little more than what I normally spend for paint, and I almost passed on it but it was just so incredible looking I said to hell with it and bought some. Damn glad I did too!
Related articles
Killer DIY Overdrive Pedal Using Turret Board
6 Degrees FX SallyDrive
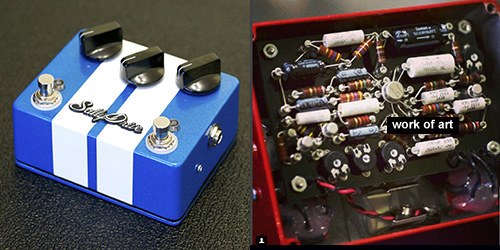
I’ve successfully built 10 pedals so far and I’m getting better with each build. All done using vero-board (strip board). Feeling more and more confident I got curious about a turret board design. I was impressed by 6 Defrees FX SallyDrive pedal and how cool the guts look. These things are a work of art for sure. So I got hold of a couple of turret strips and reworked them into a double row layout and cut them to work for this new pedal. Using the turret board makes the build easy and it looks good, but it does have a down side: to fit it into a smaller enclosure you’re limited to a design with few components. I looked and found one that was not only easy to build, but easy to mod as well. (this is nowhere near on the level of 6 Degrees work, but you gotta start somewhere).
The design is based on a LovePedal Woodrow which itself is based on the venerable Electra Distortion circuit which is a great base to work from. It requires minimal components. Here’s a link to the layout which is actually a tagboard layout but it was easy enough to transpose for the turrets. (No solder bridges on this build woo whooo!).
https://tagboardeffects.blogspot.com/2013/01/lovepedal-woodrow.html
Turretboard layout
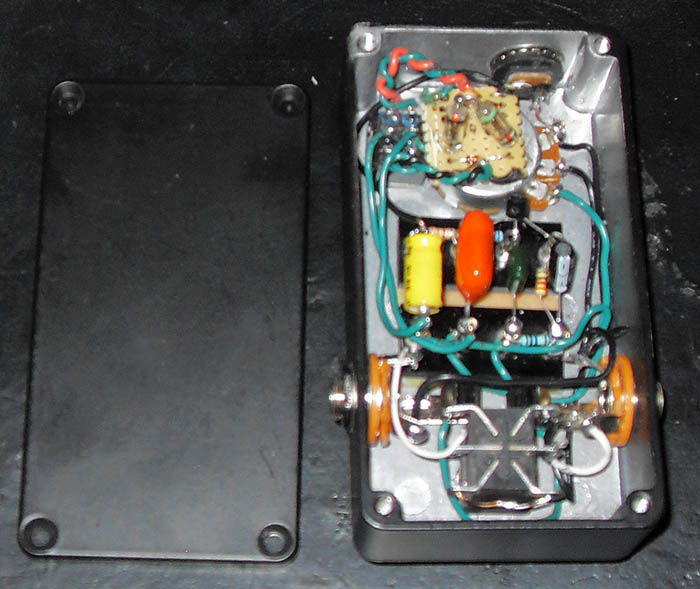
Turret-build overdrive
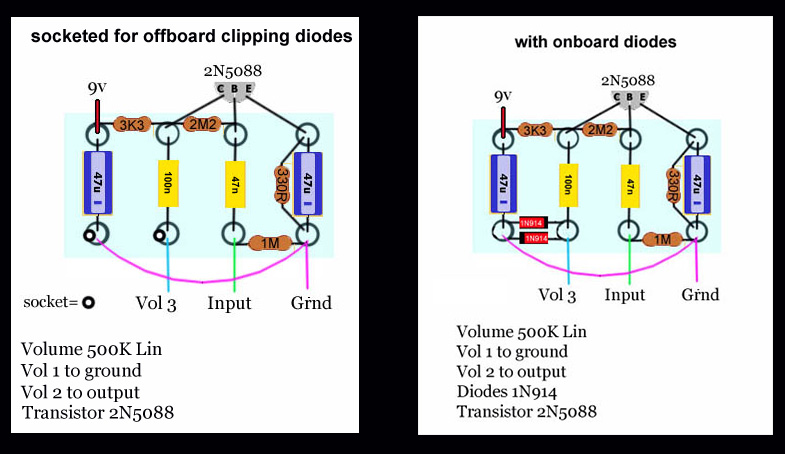
The only change I made was to socket the connections for the diodes to take them off-board. This way I could build a diode switching option for silicon / germanium clipping. I’m a big fan of germanium circuits and asymetrical clipping and I recently came into possession of some vintage 1N541 Germanium diodes that I pulled from an antique radio. Once I had them I couldn’t wait to try them out. And holy crap they sound awesome! I used three 1N541s for germanium clipping then I used three 1n914s for the silicon option (also asym). I couldn’t be happier with the results. I’ve been using a Speaker Cranker clone for awhile now and this newest build is going to replace it because I like the single knob of the SC and this new pedal can do what the SC can do and so much more. The obvious clipping options are great and this thing can also deliver a massive volume boost which I really like (the speaker cranker has a single gain knob where this new one has a single volume knob).
 If you prefer using strip boards you will find that layout on the page I linked to above. Turret, tag, or vero, I highly recommend this build if you’re still learning how to build pedals. It’s a great sounding pedal and will be a real confidence booster.
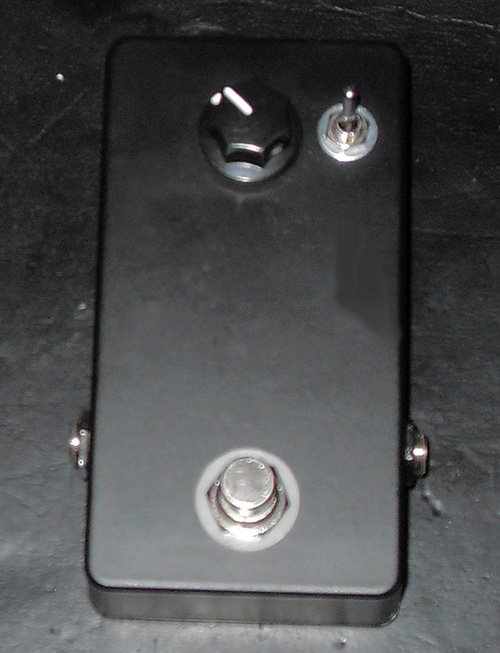
Turret build;(note clipping switch: up for germanium, down for silicon
One other minor detail but I want to mention it: I just got an order from Tayda Electronics that included one of their 1590B powder coated enclosures and it looks great! I love powder coating and this box didn’t let me down. I masked the whole thing and then drilled it out so I wouldn’t scratch it or mark it up and it came out sweet. I’m for sure going to get more of these. They come in black and white. Check them out.
Related articles
- Singular Sound Announces BeatBuddy Mini (synthtopia.com)
- combining 9V guitar pedals with a 12V lead acid battery (forum.allaboutcircuits.com)
- Looking for dark pedal steel guitar (ask.metafilter.com)
Guitar Tone Woods
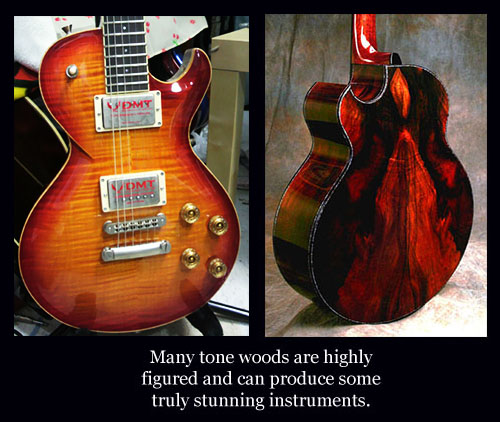
Guitar tone wood. Now that can spark a debate that can get ugly with a quickness. We have a big ol’ feud going on youtube at the moment with some pretty nasty comments going back and forth. I have my own ideas about the subject. In case you are unfamiliar with the subject let me give a brief explanation. Guitars are made of primarily wood. Many different types and species of woods are used. And there are several specific types that fall into a category known as “tone woods” (cocabola, rosewood, koa, flame maple, spruce, sitka etc). The idea here being that these woods have some affect on the tone the guitar produces. Many manufacturers may use more than one type on a single guitar to presumably achieve a desired tone. Many manufacturers use this as a sales tool and it can even affect the end price of a guitar. Now it seems we have two viewpoints on the subject: 1. tone wood makes a difference in the tone and 2. it has no affect at all. But I have to say that there is a 3rd viewpoint on this subject as well.

First let me state that yes there are controlled experiments that render measurable returns. These are done in a variety of ways but always include the use of oscilloscopes, meters, tuners and a lot of other equipment. I’m not refuting the results of most of these tests. But you see there are many people that claim to be able to hear a difference with nothing more than their ears. I believe the scientific evidence to be valid when the results are repeatable. However I also feel that if a guitarist that’s been playing for any appreciable amount of time and says he (or she) can hear the difference in tone woods, then who’s to say they’re wrong? I’m also sure there are some that only hear a difference because they want to hear it. Of course there are also those that say there is no difference and they will never hear a difference even if it’s real because their minds are closed to it. If you hear it then for you the case is closed. You know what you are hearing. If you don’t hear it then the case is closed for you as well. And besides all of that, if a dude hears it and likes what he hears then he may be inspired to play more and enjoy it more as well. and there ain’t a damn thing wrong with that!
Consider this:
It’s kind of like ghosts. I can tell you without any doubt in my mind that they exist because I’ve been face to face with one at a distance of less than 24″ for about 5 seconds (doesn’t sound like a long time but I’m here to tell you it sure felt like an eternity to me). But there are skeptics that will say I’m wrong and that they don’t exist. Fuck em’. I know what I saw and they can say I’m wrong till they’re blue in the face and it doesn’t change what I saw. I firmly believe that we are so conditioned that ghosts do not exist that when we see something our minds automatically rationalize it as something else.. Unless you are open minded you may never see one. I was closed minded until I had my experience which forced my mind to open. I couldn’t move, I couldn’t breathe, I couldn’t talk, all I could do was stare wide eyed while it stared back at me and try like hell not to pee on myself. On this subject there is no debate for me. It is what it is and that’s that.

Bottom line on tone wood:
There are so many variables that affect your guitars tone that a difinitive answer is elusive. And for me I stand right smack in the middle although I kinda lean to the “it’s real” crowd. I hear the difference between guitars. My Les Paul Studio and my Dean Soltero look very similar and share some of the specs but the difference is night and day. The dean is heavier since it isn’t chambered and the sustain is incredible. It has a 3/4″ maple cap over the mahogany body and it’s got a brighter tone. Of course the pickups are way different and some of the hardware is as well so the variables are too many to say it’s the wood. But it could be, I just don’t know. That’s all I’m going to say about it because my head is starting to hurt. This subject can go quite deep if you let it. I’m going to stop thinking about it and just grab my guitar, plug it in, turn it up, and play.
Related articles
- $2,000 headphones — can you hear the difference? (cnn.com)
- Custom Guitar (the-guitar.information-about-music.com)

Blackberry Smoke On A Roll
Looks like Blackberry Smoke is on a roll now. A new (#1) album (Holding All The Roses), an American tour followed by a European tour. The thing that really jumps out at you about these guys is that when it comes to rock and roll they are purists,sticking to their roots and not falling into the corporate cesspool. This has served them well and I’m sure they’ll continue down this road just making great music. I said a long time ago that Blackberry Smoke just might save rock and roll. It looks like I was right. Here’s a llink to their new video “Rock and Roll Again”. One link is for the “Official video”, the other link is for the “uncensored, uncut, 18+ version.


A Pick Grip That Works

Sorry about the crappy image, my camera is old.
Over the years I’ve tried just about every pick grip product available. This includes all the gimmicky picks that were manufactured with some sort of no-slip grip built into them and never found one that worked. There was one add-on gripper that sort of worked but within a few minutes of playing it was rolling up under my thumb, so I quit trying that shit. Then I stumbled on something that caught my attention: “Monster Grips”. I almost didn’t check it out but my curiosity got the better of me and I’m glad it did.
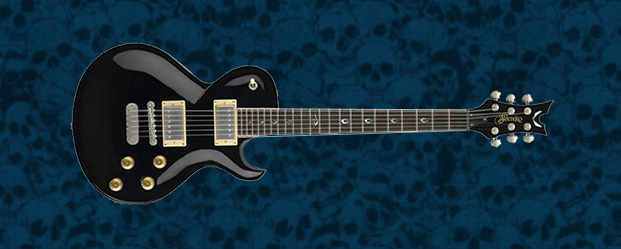
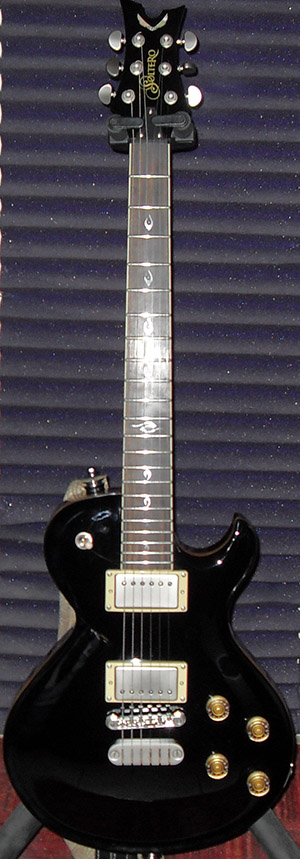
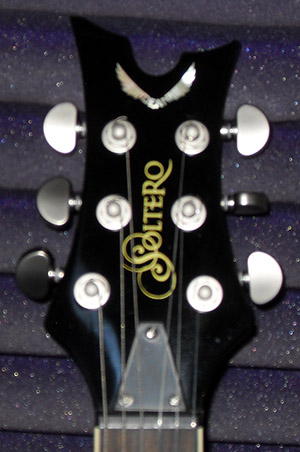
Dean Soltero
New Axe! Hell Yeah! Dean Soltero!
Just like most things worth gettin’ I seem to find them when I’m NOT looking. Case in point: The Dean Soltero. I’ve wanted one forever it seems like but just never found a deal on one. I’ve been watching craigslist for one to pop up for 3 or 4 years now. When I go to c-l, I have my standard search terms I use every time I’m on that site and Soltero is one of them. Finally hit a good one for a great price. And I spotted it the same day the ad came out. Awesome! So I bought it without trying it first because I just knew I was going to love it. And I was right! I dig everything about it.
The first thing that I noticed was the neck shape. They call it a v shape I think which sounds like it would be uncomfortable, but it’s not. In fact when I first grabbed the neck the “v” shape is obvious and it took a few to get used to the feel, but I’ll tell you once you get used to it it’s sweet. It sort of forces your hand into a position that, in my opinion, gives you better control. I’m actually liking the neck shape better than my Gibson which is a 50’s fat profile.
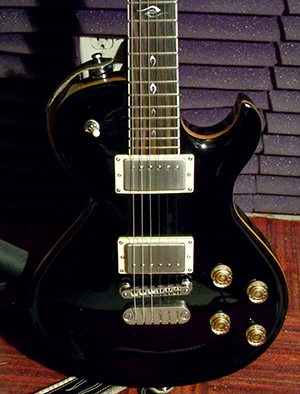
The finish is a flawless deep deep black with the maple cap exposed in it’s natural color where the body binding would be on a Gibson. It looks incredible. especially where the “cleavage” crosses over itself. It just looks cool and sets it apart from most other single cuts out there.
The neck is bound and comes with satin Grovers. Medium jumbo frets are slick as can be with no fret buzz and bends don’t fret out. This thing has massive amounts of sustain that I figure comes from the solid mahogany body, thick maple cap, and Deans own solid tailpiece that anchors tight to the body. It just feels solid in every way possible. I’m not sure which Dean pickups it has but the neck reads 7.4k and the bridge hit the meter at 13.4k. I think they may be ceramic but possibly alnico5. They’re hot for sure but they aren’t over the top and do clean up when you roll the volume back. They never get super clean, but I never play anything super clean anyway. The pups are coil tapped through push/pull tone pots that are smooth as silk and no pops or scritches. But I only checked them for noise and haven’t really played anything through them yet so I won’t comment on the s-c tone just yet. What I will say is that this is my new #1. Wow, never thought I’d say that. Don’t get me wrong, I still love my Gibson, but this Soltero just blows me away. I can see why Leslie West plays one (he has a signature model Soltero with a single “Mountain of Tone” pickup). So me and ol’ Leslie, wow! I guess that makes us “brothers” huh?
Related articles
- Resurrecting a Dead Guitar (nathanguitars.com)
- The Flamethrower Guitar From Mad Max: Fury Road Actually Works (gizmodo.co.uk)
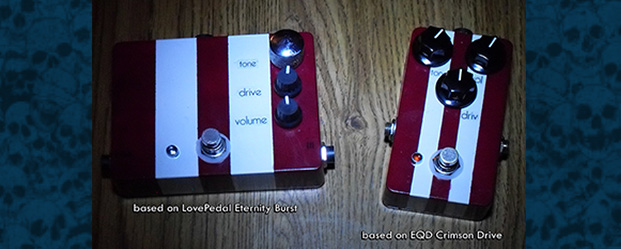
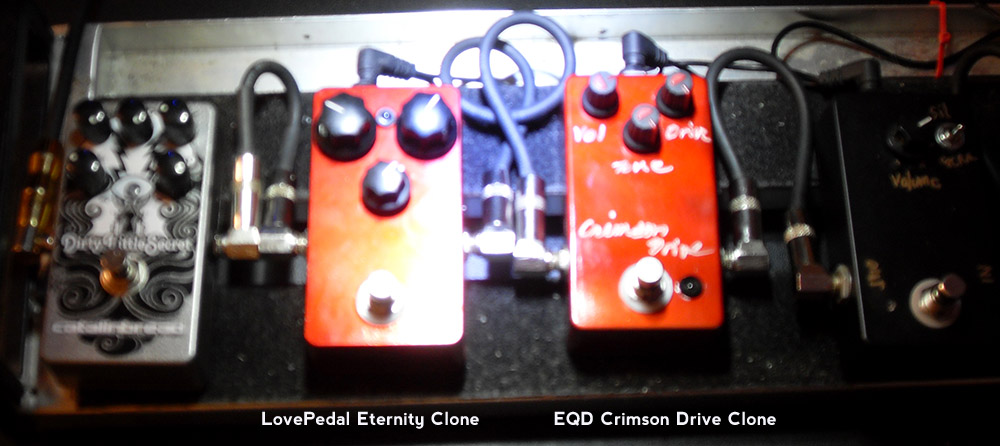
DIY Eternity Burst and Crimson Drive Pedals!
 I wanted to learn to build my own guitar pedals to save money, so I jumped in with both feet. I know how to solder, and electronics is something I am familiar with to a degree, but I’m talking minor repair stuff, not constructing circuits like these. I now understand what motivates most of the guys in the DIY world: It’s not so much about saving money, it’s more about the feeling of major accomplishment when you finish a build and plug it in and the damn thing actually works! It’s an incredible thing to put a bunch of components together and have a working fx pedal come out the other end. I just finished two more pedals that came out awesome. The first is based on a LovePedal Eternity Burst overdrive and the other is my new favorite and it’s based on an Earthquaker Devices Crimson Drive. It’s my first germanium based pedal and it’s freakin cool. I dig it. You may notice they both share the same paint design. I painted the Eternity first and I liked it so much I used the same scheme and colors on the Crimson Drive. (I borrowed the idea from the 6 Degrees FX Sally Drive). I’m looking at some other directions to take that part of the whole process, like powder coating, acid etching, and dipping. I have another idea for a carbon fiber enclosure that I’m looking into now. Hopefully that one will pan out.
 In my previous posts I laid out a method for beginners to get some experience building these things by eliminating what is to me the most frustrating part of the whole process, which is soldering all the little parts to the board without shorting anything out. They’re really close together and it just takes practice and patience to master. In fact the board from the Eternity is the one in the previous post and it’s my last build using the expanded vero board method. The Crimson Drive isn’t my first build using the standard compact layout, but it’s my first successful one. Even though it didn’t work on the first test run it still felt pretty damn good that I only had to debug it once. (had the input and output wires reversed on the switch). I’ve also learned to order parts in quantity so that I don’t have to order more for every build. There’s a ton of shit that I still have to learn about these circuits, and I REALLY need to work on wiring everything together in the enclosure, so I’ll keep plugging away at it. But as of now I’ve learned enough to have fun with it. And I get some awesome pedals in the process!
The Eternity has an issue but I’m sure I’ll figure it out soon. It works and sounds really good until you turn the gain past 2 o-clock. That’s where a high pitched squeal starts. Very weird. But that’s part of the fun with these things. Debugging is just part of the process. You can find a ton of layouts over at Guitar FX Layouts, here’s a link https://tagboardeffects.blogspot.com Next post I’ll cover soldering equipment.
Rock On!
Related articles
- Stomp Box DIY For Absolute Beginners (guitarlounge.rocks)
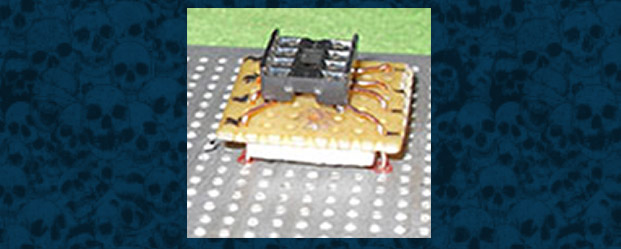
IC Chip Easy Workaround
Using an 8 pin IC socket on an expanded vero board

 One of the drawbacks to using an expanded vero board is attaching IC Chips like op-amps because obviously the pins can’t be expanded to match the board, but I have a workaround for this (you need to use an ic socket for this). First you have to determine where the connecting points need to be on the expanded board (makes it easier if you mark them Fig. 1). Next cut a piece of perfboard (plain with no copper on the back side) that will cover those points. Look at fig. 0 and you will see what I mean. Now take 8 little pieces of 22 gauge solid wire and bend them in a u shape with one side beign longer than the other and place the short end in the hole whare the socket pin will also go and the long end into the hole that matches up with the new pin locations. Place the socket so the pins are in the same holes as the wires then solder them in place (Fig. 2, 3, 4). From the underside use double face foam tape to cover the solder connections and simply slip the whole thing onto the expanded board and solder into place (Fig. 5, 6). To be honest I don’t know if this method is even accepted or proper or correct, but I do know that it freakin works!
Original article on DIY stomp boxes for absolute beginners
Related articles
- SOIC to DIP Adapter 8-Pin (sparkfun.com)
- How to build boards with connections on BOTH sides (help) (forum.allaboutcircuits.com)

Stomp Box DIY For Beginners
So you want to build your own guitar FX pedals eh?
 If you’ve tried getting into the whole DIY thing you know how frustrating it can be for a newbie to figure how to do certain things especially if you want to build fx pedals (trust me I know). There’s tons of sites that are excellent resources for this and these guys know what the hell they’re talking about, and the forums and/or comments are packed full of information. But they are generally geared for those with knowledge of electronics and even experience doing their own mods. I started out with less then a cursory knowledge of electronics but I have now taught myself how to mod my own tube amps, mod pedals, and even build pedals from scratch. If I can do it so can you. Pick a starting project then research research research. And when you done researching it do it some more. I can’t stress this enough. The info is there, you just have to find it. What I’m putting out in this article is a method for beginners that will help with some of the more common issues faced when learning to do this shit. Here’s how it works: the usual starting point for any project is a schematic. As far as schematics go, far and away the best method to use is a vero board layout. These are much more than a schematic as far as I’m concerned. They’re readily available on the net and they really make placement of the components easier, but it has its quirks too. Like soldering all those tiny connections without creating tiny little solder bridges. Bottom line is it simply takes practice and experience. This variation will make it easier to get that experience. Keep in mind that this is in no way meant as a permanent method of using vero board, rather it’s a way to complete a few builds successfully, gain a bit of experience at soldering and start learning about circuits all at at the same time without much of the frustration and a box full of failed projects (I know all about that too).
(side note: You have to keep in mind that you are going to have failures. No way around that. Bugs are a fact of life for even the most experienced stomp box builder, and learning to diagnose bugs is part of the process. And you will use Google a lot. Research goes a long way remember? But this will help reduce at least some of the more common mistakes when you’re just starting out)
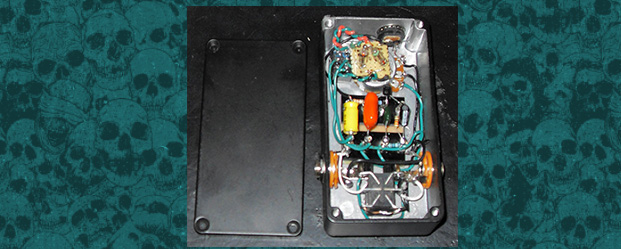
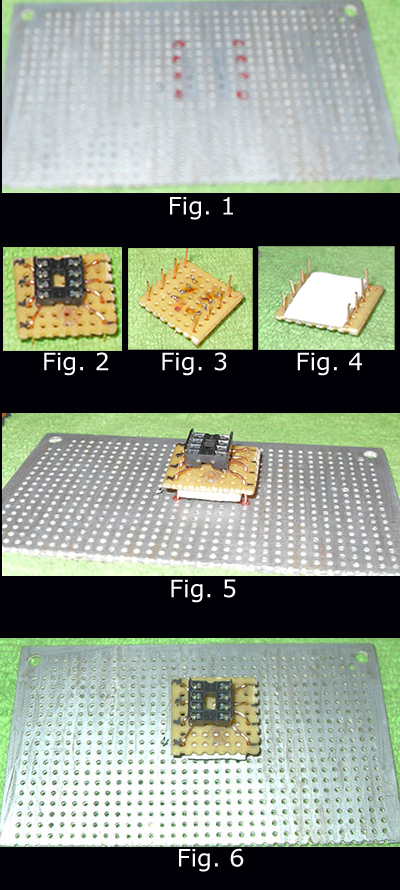
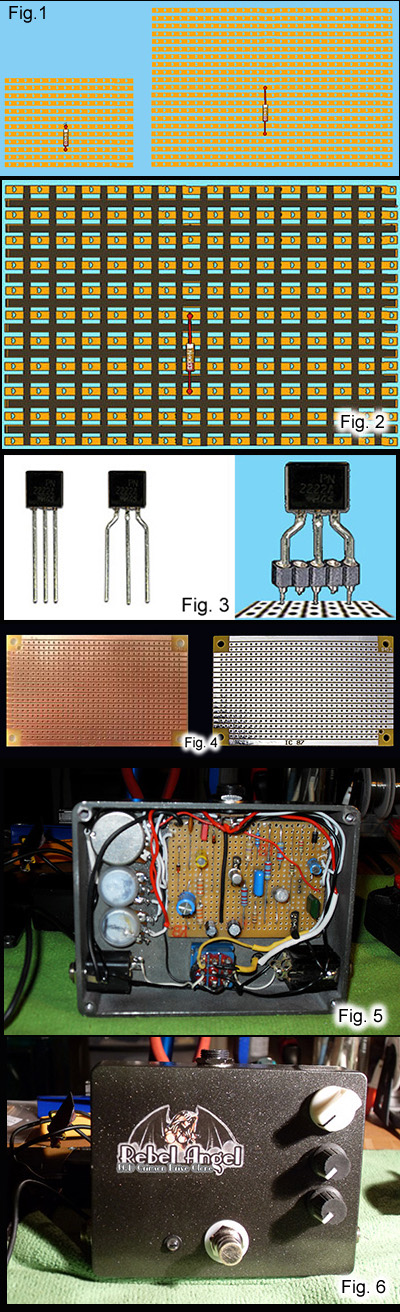
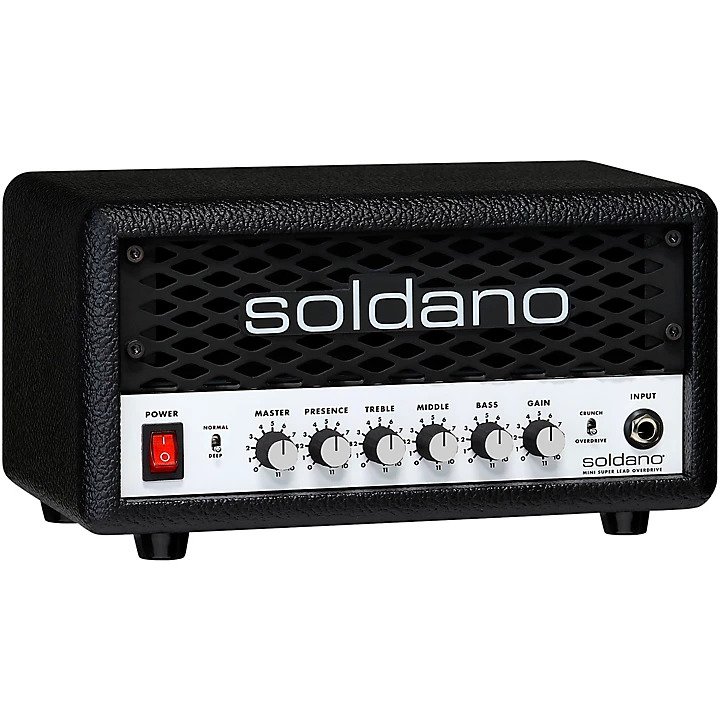
It’s simple really, You take a vero layout and expand it out to put an unused row and column between each valid row and column. Fig. 1 shows a component that’s actually in the exact same location on each board. It’s just that the second board is expanded. On my first attempt I kept losing track of the unused rows so I marked them out with a black Sharpie marker like Fig. 2.
The down side is you have to use the larger enclosure due to the larger board, but this is only meant to allow you to create a few successful builds and fine tune your soldering hand before you go for the smaller boards. Then you can start using the smaller enclosures. Another thing you will run into is mounting transistors and IC chips. For transistors the solution is simple: use sockets. In Fig.3 you can see how to bend the pins to make it work. If you need a 3 pin socket just make it a 5 and clip the pins off the ones not used. IC chips (op-amps etc) are another issue and I have a workaround for that as well. Here’s a link to it. IC_Chips .
As far as vero board goes there are two types (that I know of). One uses copper strips and the other uses silver (Fig. 4). I prefer the silver strips and I solder them with silver solder. There is no real technical reason for that it’s just that I like the boards with the silver strips and it just seemed logical to use silver solder. It seems to hold up quite well as it withstands the heat from the solder better than copper.
The solder I use is .022″ Dia. rosin core Silver Solder 62/36/2 because it has a slightly lower melting point than 60/40 and it snaps back fast. Just make sure you don’t move the component till the solder flashes or you could end up with a poor solder joint.
Fig.5 shows an expanded board in an enclosure. Fig. 6 is the front. This is an EQD Crimson Drive and it sounds incredible. And, yes, I had some bugs with it but it was just one missed cut on the second strip from the top. And it only took me a day and a half to figure it out. It’s the simple ones that really get you. But all is right with the world now. I also did an EQD Speaker Cranker that turned out great as well, but both will be redone with a standard vero board and placed into a small enclosure in the next few weeks. Then I can always reuse the larger enclosures for a build that requires it. No waste.
One last suggestion, when you’re looking for a layout for your first several builds, don’t pick one that has a gazillion components on the board. Pick one with as few comps as possible. If you want to find out what a particular design sounds like just youtube it, but keep in mind that your build won’t sound exactly like the demo. Hell they don’t sound the same even when you go buy a new pedal. But the videos can give you a general idea so at least you will know what territory you’re in.
So there is my contribution the the DIY world. If this helps even one person to get started then it was all worth it. Here are some links that you will find useful and indispensable. They contain the knowledge of the DIY universe. The first one on the list is a video channel with a bunch of great videos for everybody from beginners on up to seasoned builders.
https://www.youtube.com/user/chromespherecom
https://tagboardeffects.blogspot.com/
https://www.freestompboxes.org/
https://buildyourownclone.com/
https://www.generalguitargadgets.com/
Related articles
- Re: Soldering Stations Expensive but Handles are Cheap! (eevblog.com)


 Soldano SLO Mini 30 Watt Killer AmpIn All Posts, Amps, ReviewsI have never gotten excited about ANY solid state amp. […]
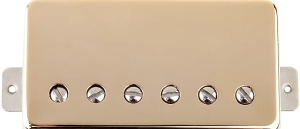 Leslie West Mountain of Tone PickupIn All Posts, Guitars, ReviewsWhen it comes to electric guitars, it’s common […]
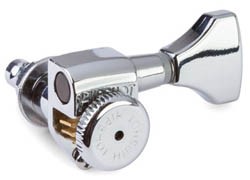 the BEST Guitar Tuners EverIn All Posts, DIY Mods, Repairs, ReviewsOver the past 20 yrs. it’s safe to say […]
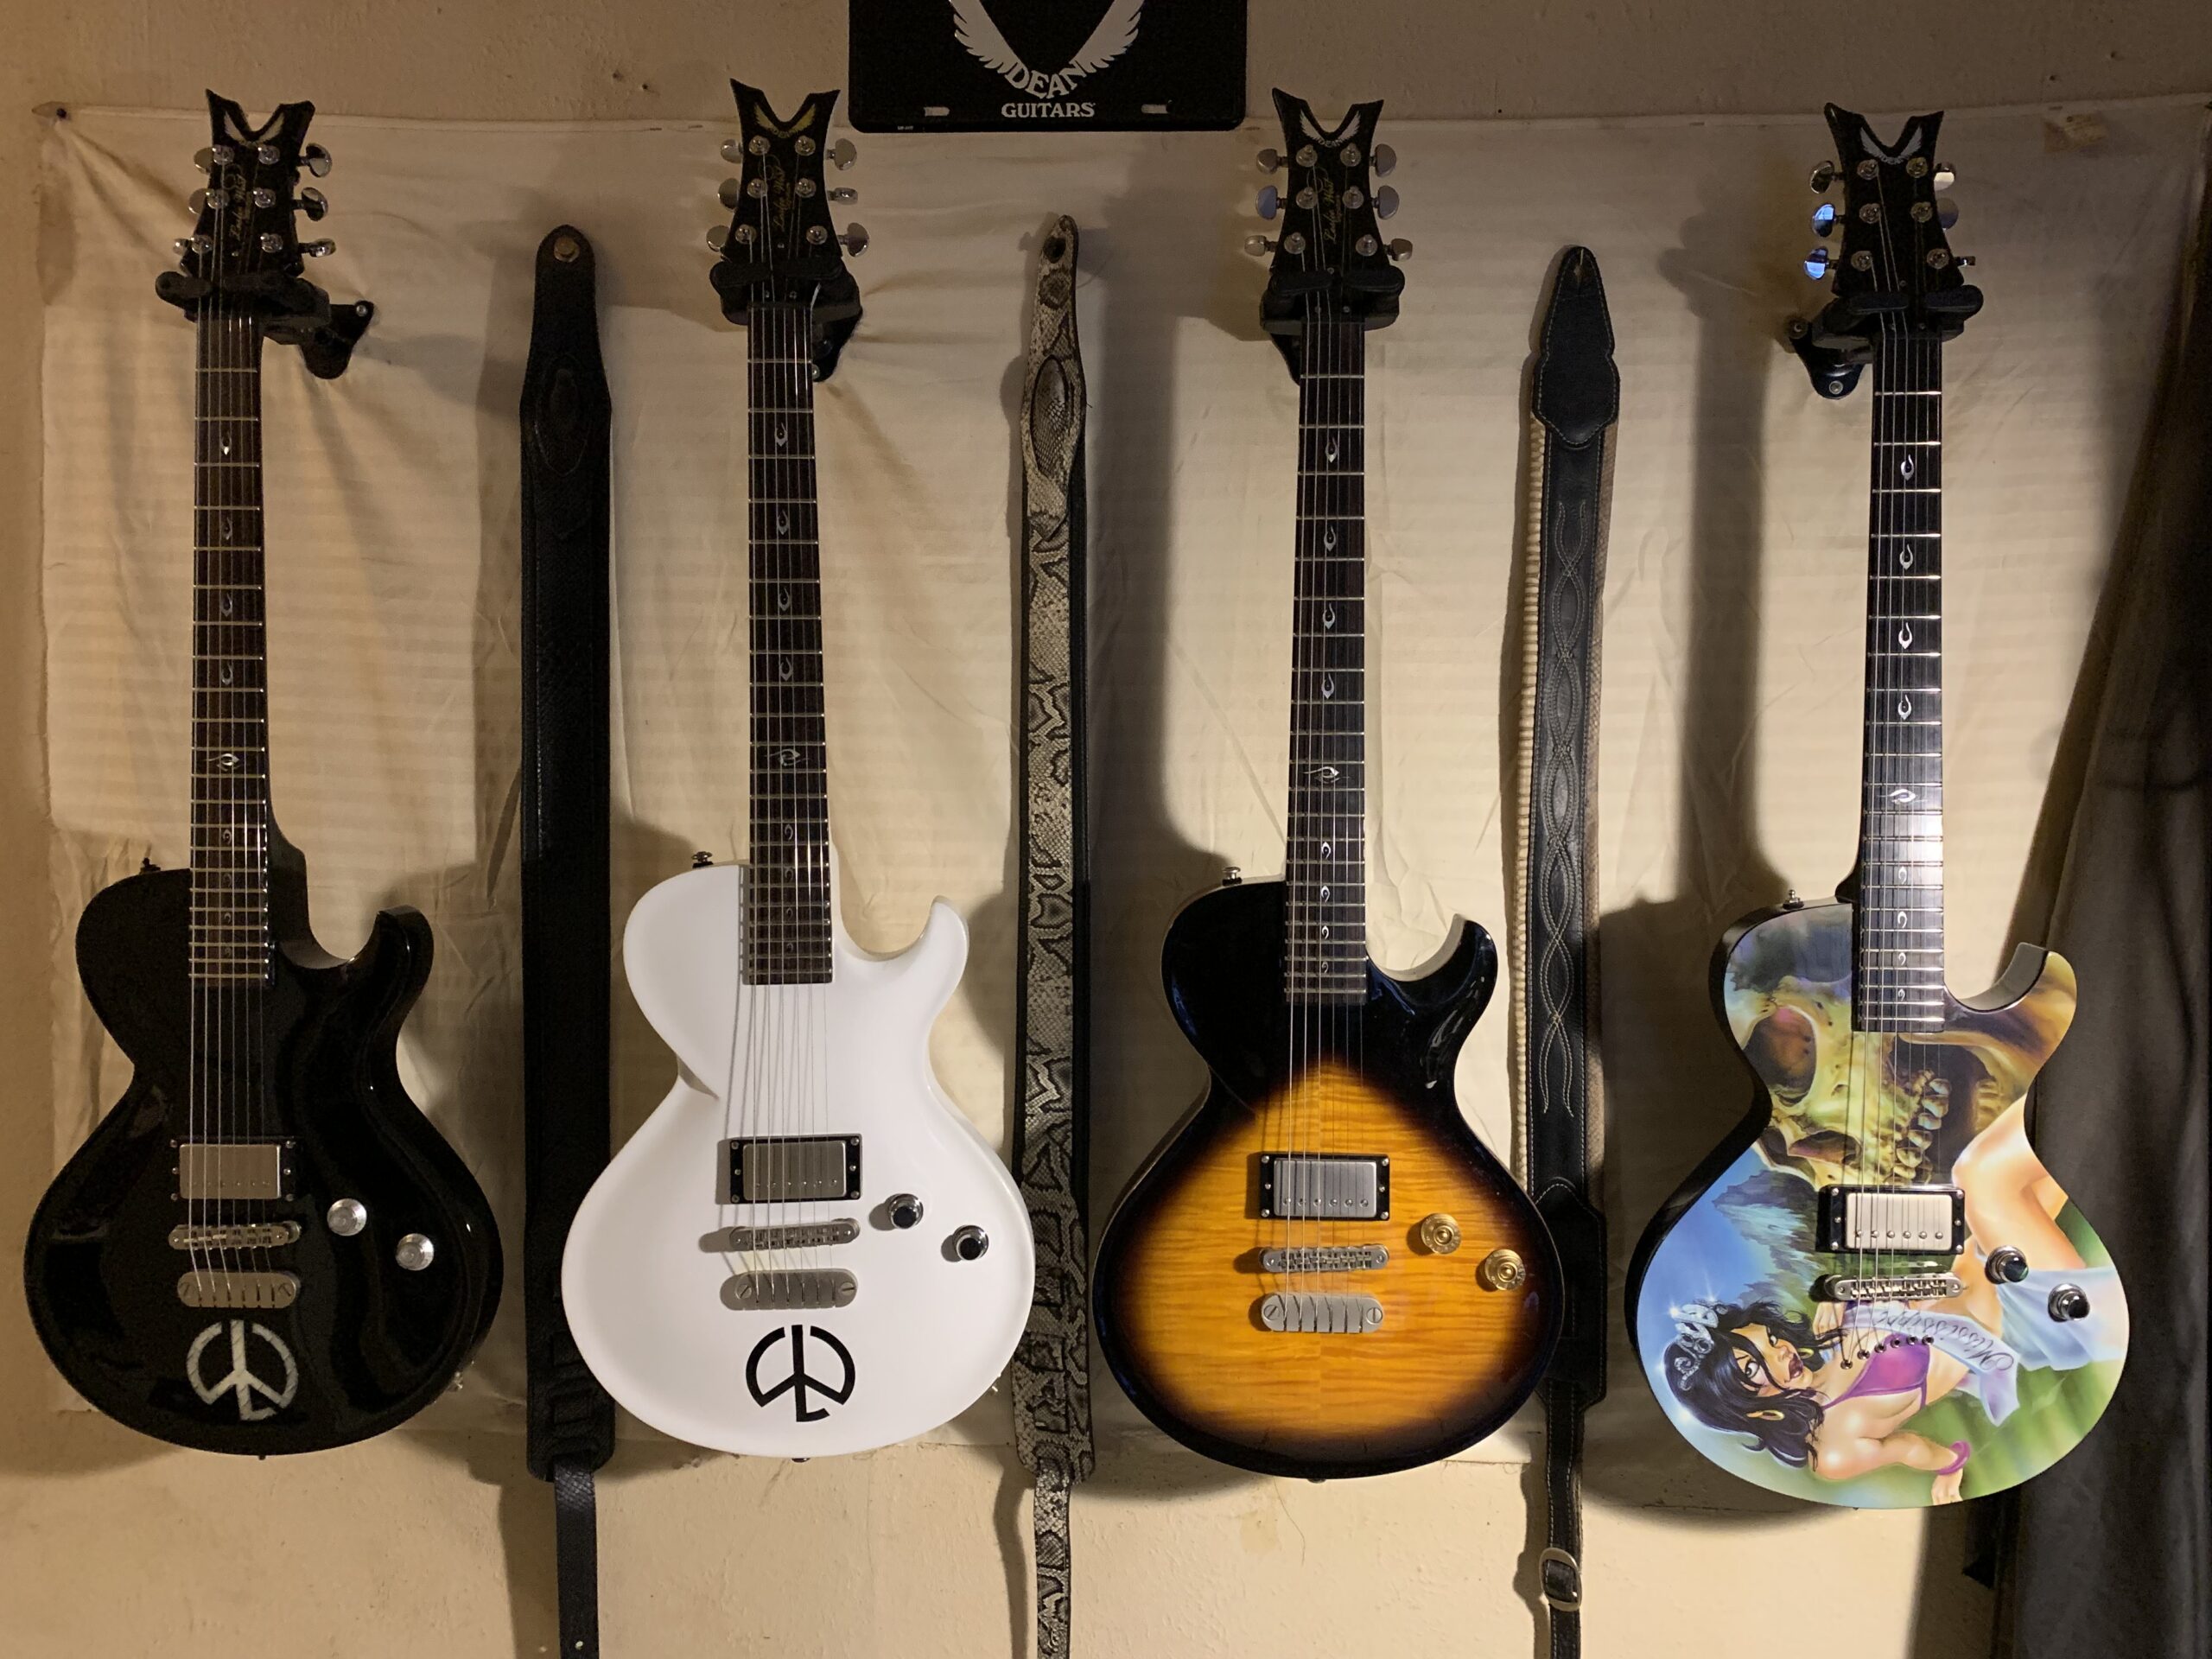 Dean Leslie West Signature ModelIn All Posts, Featured, Guitars, News, ReviewsLeslie West gained fame the world over during his […]
 Tributes to Leslie WestIn All Posts, Featured, NewsI’ve been playing guitar since […]