
Stomp Box DIY For Beginners
So you want to build your own guitar FX pedals eh?
 If you’ve tried getting into the whole DIY thing you know how frustrating it can be for a newbie to figure how to do certain things especially if you want to build fx pedals (trust me I know). There’s tons of sites that are excellent resources for this and these guys know what the hell they’re talking about, and the forums and/or comments are packed full of information. But they are generally geared for those with knowledge of electronics and even experience doing their own mods. I started out with less then a cursory knowledge of electronics but I have now taught myself how to mod my own tube amps, mod pedals, and even build pedals from scratch. If I can do it so can you. Pick a starting project then research research research. And when you done researching it do it some more. I can’t stress this enough. The info is there, you just have to find it. What I’m putting out in this article is a method for beginners that will help with some of the more common issues faced when learning to do this shit. Here’s how it works: the usual starting point for any project is a schematic. As far as schematics go, far and away the best method to use is a vero board layout. These are much more than a schematic as far as I’m concerned. They’re readily available on the net and they really make placement of the components easier, but it has its quirks too. Like soldering all those tiny connections without creating tiny little solder bridges. Bottom line is it simply takes practice and experience. This variation will make it easier to get that experience. Keep in mind that this is in no way meant as a permanent method of using vero board, rather it’s a way to complete a few builds successfully, gain a bit of experience at soldering and start learning about circuits all at at the same time without much of the frustration and a box full of failed projects (I know all about that too).
(side note: You have to keep in mind that you are going to have failures. No way around that. Bugs are a fact of life for even the most experienced stomp box builder, and learning to diagnose bugs is part of the process. And you will use Google a lot. Research goes a long way remember? But this will help reduce at least some of the more common mistakes when you’re just starting out)
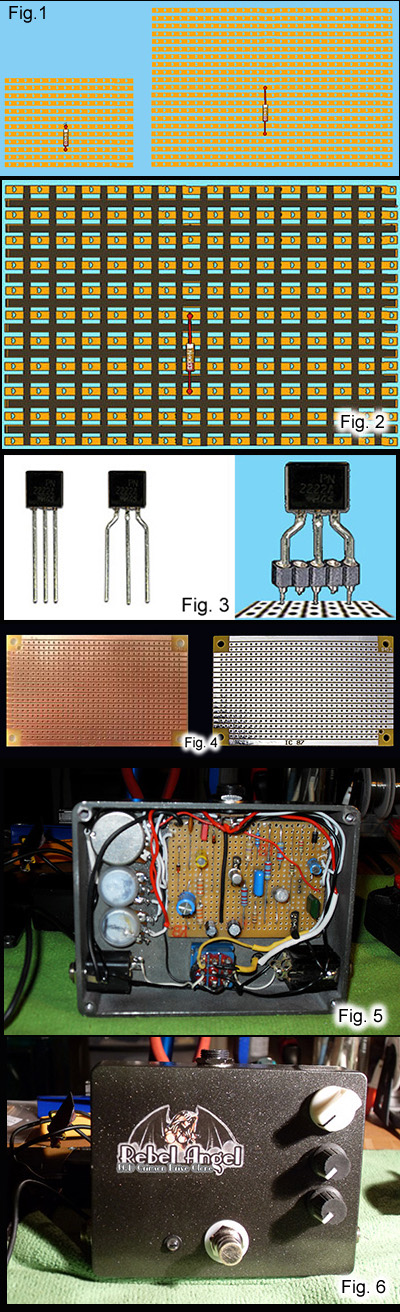
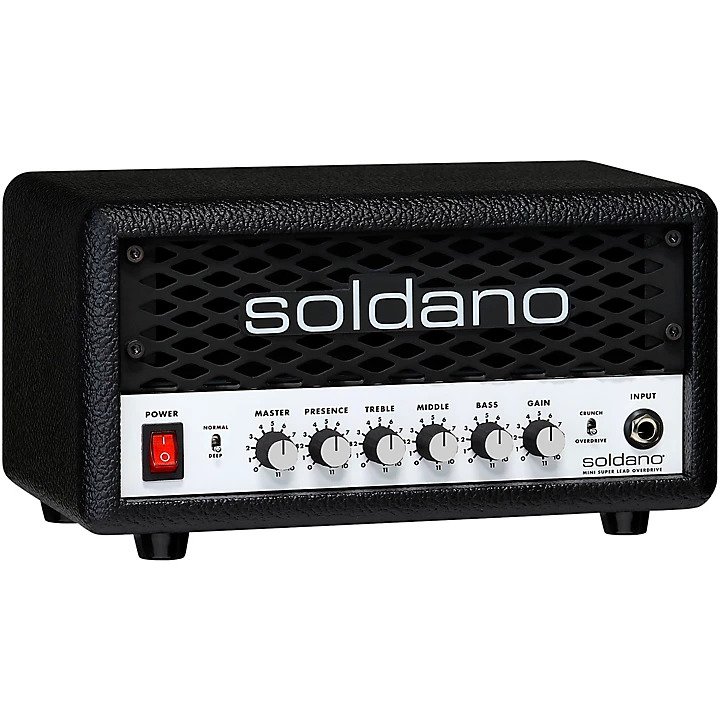
It’s simple really, You take a vero layout and expand it out to put an unused row and column between each valid row and column. Fig. 1 shows a component that’s actually in the exact same location on each board. It’s just that the second board is expanded. On my first attempt I kept losing track of the unused rows so I marked them out with a black Sharpie marker like Fig. 2.
The down side is you have to use the larger enclosure due to the larger board, but this is only meant to allow you to create a few successful builds and fine tune your soldering hand before you go for the smaller boards. Then you can start using the smaller enclosures. Another thing you will run into is mounting transistors and IC chips. For transistors the solution is simple: use sockets. In Fig.3 you can see how to bend the pins to make it work. If you need a 3 pin socket just make it a 5 and clip the pins off the ones not used. IC chips (op-amps etc) are another issue and I have a workaround for that as well. Here’s a link to it. IC_Chips .
As far as vero board goes there are two types (that I know of). One uses copper strips and the other uses silver (Fig. 4). I prefer the silver strips and I solder them with silver solder. There is no real technical reason for that it’s just that I like the boards with the silver strips and it just seemed logical to use silver solder. It seems to hold up quite well as it withstands the heat from the solder better than copper.
The solder I use is .022″ Dia. rosin core Silver Solder 62/36/2 because it has a slightly lower melting point than 60/40 and it snaps back fast. Just make sure you don’t move the component till the solder flashes or you could end up with a poor solder joint.
Fig.5 shows an expanded board in an enclosure. Fig. 6 is the front. This is an EQD Crimson Drive and it sounds incredible. And, yes, I had some bugs with it but it was just one missed cut on the second strip from the top. And it only took me a day and a half to figure it out. It’s the simple ones that really get you. But all is right with the world now. I also did an EQD Speaker Cranker that turned out great as well, but both will be redone with a standard vero board and placed into a small enclosure in the next few weeks. Then I can always reuse the larger enclosures for a build that requires it. No waste.
One last suggestion, when you’re looking for a layout for your first several builds, don’t pick one that has a gazillion components on the board. Pick one with as few comps as possible. If you want to find out what a particular design sounds like just youtube it, but keep in mind that your build won’t sound exactly like the demo. Hell they don’t sound the same even when you go buy a new pedal. But the videos can give you a general idea so at least you will know what territory you’re in.
So there is my contribution the the DIY world. If this helps even one person to get started then it was all worth it. Here are some links that you will find useful and indispensable. They contain the knowledge of the DIY universe. The first one on the list is a video channel with a bunch of great videos for everybody from beginners on up to seasoned builders.
https://www.youtube.com/user/chromespherecom
https://tagboardeffects.blogspot.com/
https://www.freestompboxes.org/
https://buildyourownclone.com/
https://www.generalguitargadgets.com/
Related articles
- Re: Soldering Stations Expensive but Handles are Cheap! (eevblog.com)
Russ
Dean Soltero, Dean Leslie West Signature Models (4 of them) Hamer Studio, Gibson Les Paul, Epiphone Les Paul (Korean), Ovation Celebrity, Gibson Hummingbird, Blackstar HT-1R, Jet City JCA20H, Laney Cub 12R, Orange OR-15 and a lot of dirt pedals, some store bought some homegrown.
Leave a Comment
Leave a Comment


 Soldano SLO Mini 30 Watt Killer AmpIn All Posts, Amps, ReviewsI have never gotten excited about ANY solid state amp. […]
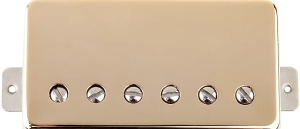 Leslie West Mountain of Tone PickupIn All Posts, Guitars, ReviewsWhen it comes to electric guitars, it’s common […]
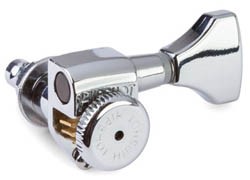 the BEST Guitar Tuners EverIn All Posts, DIY Mods, Repairs, ReviewsOver the past 20 yrs. it’s safe to say […]
 Dean Leslie West Signature ModelIn All Posts, Featured, Guitars, News, ReviewsLeslie West gained fame the world over during his […]
 Tributes to Leslie WestIn All Posts, Featured, NewsI’ve been playing guitar since […]
2 Comments so far
Give Your DIY Stompboxes a Stunning Anodized FinishPosted on 11:13 am - Nov 23, 2015
[…] I got into the whole DIY stompbox thing I find myself looking for those things that will make a build unique. I’m sure you all […]
DIY Eternity Burst and Crimson Drive: Awesome Pedals! : My Guitar LoungePosted on 5:39 am - Feb 20, 2015
[…] Stomp Box DIY For Absolute Beginners (guitarlounge.rocks) […]