
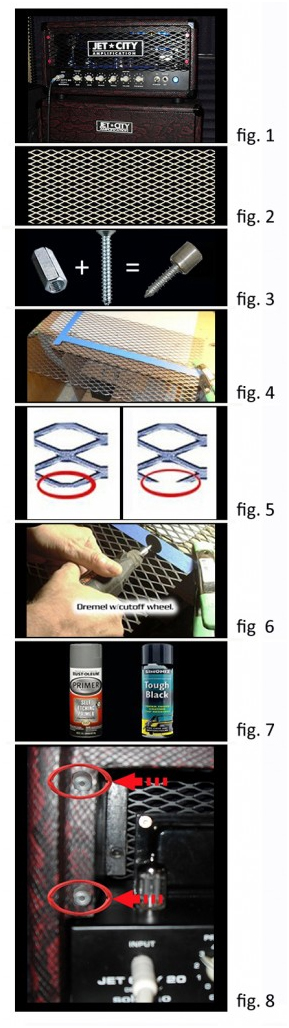
Jet City JCA20H Front Baffle MOD
Jet City JCA20H Baffle MOD using expanded metal.
I bought my Jet City JCA20H the week they hit the stores, and I bought it without test driving it. I never considered it since the thing was designed by Soldano, plus everything I had read leading up to the first shipment going out was all good. I was not wrong. This is one of the ballsiest straight up rock & roll amps I’ve ever plugged into. After dialing it in with a tube upgrade and a minor internal mod I decided it needed a facelift. What i came up with was the expanded metal like Soldano uses on his mega-buck models. And it should work for most tube amps with some minor adjustments. It definitely gives the amp a “SOLDANO” vibe (fig. 1) while increasing the airflow to the tubes. So it isn’t strictly cosmetic. And with this type of baffle you can add LED lights to illuminate the tubes and other shit inside. The whole thing costs about $30 but you get enough materials for two baffles. So you can make one for the back side of your amp or make one for a buddy. (click image for larger view) I also put a video up on YouTube a long time ago, but you’ll get more detailed information from this article. If you want to check out my video, here’s a link to it. JCA20H_baffle_MOD
Expanded metal at Home Depot (fig. 2)
What you’ll need to do this mod:
- Expanded or perforated metal at least 6″ x 20″
- 1/2″ coupling nuts with 6-32 internal threads. (4)
- 1″ course thread screws (drywall screws work pretty good for this) (4)
- Computer case thumb screws (4)
- Dremel with reinforced cut-off wheel (good tin snips will work if you don’t have a Dremel)
- Medium to fine metal file (1 or 2 of each)
- 100 grit and 400 grit sand paper
- Masking tape (painters tape if possible so it doesn’t leave any residue)
- Lacquer thinner (or some kind of solvent. Alcohol works in a pinch)
- Self-etching automotive primer
- Black spray paint. Flat doesn’t look to good but semi-gloss or high-gloss will work just fine.
Start by removing the factory front baffle by accessing the screws from the rear of the amp. Check the opening for size. For the JCA20H it will be 17 7/8″ x 5″. The 5″ height measurement puts the lower edge of the new baffle even with the top edge of the chassis. I added 3/8″ to mine so it would extend just a bit lower than the chassis. And If you want to roll the edges inward you need to add a little all the way around to compensate.
Clean the new metal with solvent to remove the coating of oil. Then figure your cut lines and tape them off (fig. 4). The tape will act as a guide for cutting. Clamp it down tight to a solid surface and cut along the tape with the Dremel (or tin snips). (fig. 6)
NOTE: Watch out that you don’t mark it to cut in such a way that it will leave razor sharp points along the upper or lower edge. They not only look bad, but they’re freakin’ dangerous too! (fig. 5)
Once that’s done take a file and clear any burrs or sharp pieces of metal from the edges. Then sand both sides with 100 grit paper followed with 200 or 400.
Primer both sides and let it dry. Then apply the color coat. Several light coats with adequate drying time between coats will give better results.
Next, cut the heads off the 1″ screws (fig. 3) and force thread them into the coupling nuts. You may need to hit the screws with a file just a little to make this easier.
Hold the new baffle against the face of the amp and mark 4 mounting locations with a scratch awl of a Sharpie marker. Drill a hole at each mounting point and screw the coupling nuts down tight. (fig. 8)
Hold the new baffle against the coupling nuts and fasten it in place with the knurled thumb screws.
That’s it. All that’s left is to reattach your Jet City badge and you are ready to rock.
In my next post I’ll show you how to install LED lights. And I’ll show you how to power the LEDs internally from the amp, including an on-off switch so you don’t have to use an external power adapter.
Heres a short video

Russ
Dean Soltero, Dean Leslie West Signature Models (4 of them) Hamer Studio, Gibson Les Paul, Epiphone Les Paul (Korean), Ovation Celebrity, Gibson Hummingbird, Blackstar HT-1R, Jet City JCA20H, Laney Cub 12R, Orange OR-15 and a lot of dirt pedals, some store bought some homegrown.
Leave a Comment
Leave a Comment


 Soldano SLO Mini 30 Watt Killer AmpIn All Posts, Amps, ReviewsI have never gotten excited about ANY solid state amp. […]
 Leslie West Mountain of Tone PickupIn All Posts, Guitars, ReviewsWhen it comes to electric guitars, it’s common […]
 the BEST Guitar Tuners EverIn All Posts, DIY Mods, Repairs, ReviewsOver the past 20 yrs. it’s safe to say […]
 Dean Leslie West Signature ModelIn All Posts, Featured, Guitars, News, ReviewsLeslie West gained fame the world over during his […]
 Tributes to Leslie WestIn All Posts, Featured, NewsI’ve been playing guitar since […]
2 Comments so far
jamesPosted on 9:41 pm - Oct 31, 2016
That looks awesome – I want one with the leds.
Where is your LED post?
what can you use to clean your guitar neckPosted on 5:07 pm - May 26, 2014
Ilike thе valuable info you provide for your ɑrticles.
I’ll bookmark yopur blog and test again right here frequentlƴ.
I’m гather sure I’ll learn lots of nnew stuff prօper herе!
Goοod luck for the next!
My web pagе … what can you use to clean your guitar neck